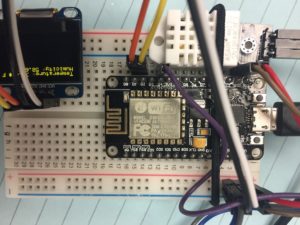
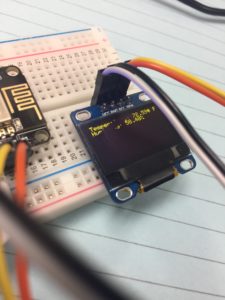
In this post I present an overview building a weather station I could place in my garden, hoping to monitor temperature and humidity. I’ll use a esp8266 NodeMCU WiFi module to stream this data to Losant, an IOT platform. We’ll also display these readings on a ssd1306 0.96″ OLED screen. The temperature and humidity are observed using a DHT22 sensor module. Eventually I’ll add moisture probes that will be used to trigger relays used to active a sprinkler during the hot, dry months of July and August in Wisconsin. Other goals include adding sensors to monitor rainfall, wind speed, and wind direction.
My code went through a few iterations to start. I wanted to take readings from the DHT22 and put them on the console monitor. I also printed some simple banner to the OLED display as well. At one point I found an i2c scanner to ensure my laptop could see the esp8266. In the end, I combined code with the examples from Losant to stream sensors readings to the cloud over WiFi and to a 128×64 OLED.
i2c Scanner
// --------------------------------------
// i2c_scanner
//
// Version 1
// This program (or code that looks like it)
// can be found in many places.
// For example on the Arduino.cc forum.
// The original author is not know.
// Version 2, Juni 2012, Using Arduino 1.0.1
// Adapted to be as simple as possible by Arduino.cc user Krodal
// Version 3, Feb 26 2013
// V3 by louarnold
// Version 4, March 3, 2013, Using Arduino 1.0.3
// by Arduino.cc user Krodal.
// Changes by louarnold removed.
// Scanning addresses changed from 0...127 to 1...119,
// according to the i2c scanner by Nick Gammon
// http://www.gammon.com.au/forum/?id=10896
// Version 5, March 28, 2013
// As version 4, but address scans now to 127.
// A sensor seems to use address 120.
// Version 6, November 27, 2015.
// Added waiting for the Leonardo serial communication.
//
//
// This sketch tests the standard 7-bit addresses
// Devices with higher bit address might not be seen properly.
//

#include <Wire.h>


void setup()
{

 Serial.begin(9600);
 while (!Serial); // Leonardo: wait for serial monitor
 Serial.println("\nI2C Scanner");
}


void loop()
{
 byte error, address;
 int nDevices;

Wire.begin();

 Serial.println("Scanning...");

 nDevices = 0;
 for(address = 1; address < 127; address++ )
 {
 // The i2c_scanner uses the return value of
 // the Write.endTransmisstion to see if
 // a device did acknowledge to the address.
 Wire.beginTransmission(address);
 error = Wire.endTransmission();

 if (error == 0)
 {
 Serial.print("I2C device found at address 0x");
 if (address<16)
 Serial.print("0");
 Serial.print(address,HEX);
 Serial.println(" !");

 nDevices++;
 }
 else if (error==4)
 {
 Serial.print("Unknown error at address 0x");
 if (address<16)
 Serial.print("0");
 Serial.println(address,HEX);
 }
 }
 if (nDevices == 0)
 Serial.println("No I2C devices found\n");
 else
 Serial.println("done\n");

 delay(5000); // wait 5 seconds for next scan
}
128×64 OLED Test
The small display relies on the i2c communication protocol, as does the DHT22, making connections to the esp8266 very straightforward. The display has 4 pins: 3-5v logic, ground, serial clock (SCL) and serial data (SDA).
It’s essential to connect SCL,SDA pins of oled display to pins on esp8266 marked D1 and D2.
The key is to load the Adafruit_GFX and Adafruit_SSD1306 libraries.
#include <SPI.h>
#include <Wire.h>
#include <Adafruit_GFX.h>
#include <Adafruit_SSD1306.h>

#define OLED_RESET LED_BUILTIN //4
Adafruit_SSD1306 display(OLED_RESET);

#if (SSD1306_LCDHEIGHT != 64)
#error("Height incorrect, please fix Adafruit_SSD1306.h!");
#endif

void setup() {
 display.begin(SSD1306_SWITCHCAPVCC, 0x3C);

// Clear the buffer.
 display.clearDisplay();
 display.display();

display.setTextSize(1);
 display.setTextColor(WHITE);
 display.setCursor(0,0);
 display.println("Hello from:");
 display.println("http://arduino-er.blogspot.com/");
 display.display();

}

void loop() {
 // put your main code here, to run repeatedly:

}
Read DHT22 and display on OLED – Borrowed from Losant
/**
 * Example for reading temperature and humidity
 * using the DHT22 and ESP8266
 *
 * Copyright (c) 2016 Losant IoT. All rights reserved.
 * https://www.losant.com
 */

#include "DHT.h";
#define DHTPIN 2 // what digital pin the DHT22 is conected to
#define DHTTYPE DHT22 // there are multiple kinds of DHT sensors
DHT dht(DHTPIN, DHTTYPE);

//#include <Wire.h>
#include <Adafruit_GFX.h>
#include <Adafruit_SSD1306.h>
#define OLED_RESET LED_BUILTIN //4
Adafruit_SSD1306 display(OLED_RESET);

void setup() {
 Serial.begin(9600);
 Serial.setTimeout(2000);

/*display.setTextSize(1);
 display.setTextColor(WHITE);
 display.setCursor(0,0);
 display.println("Temperature:");
 display.println("Humidity");
 display.display();*/

 // Wait for serial to initialize.
 while(!Serial) { }

Serial.println("Device Started");
 Serial.println("-------------------------------------");
 Serial.println("Running DHT!");
 Serial.println("-------------------------------------");

}

int timeSinceLastRead = 0;
void loop() {

// Report every 2 seconds.
 if(timeSinceLastRead > 2000) {
 // Reading temperature or humidity takes about 250 milliseconds!
 // Sensor readings may also be up to 2 seconds 'old' (its a very slow sensor)
 float h = dht.readHumidity();
 // Read temperature as Celsius (the default)
 float t = dht.readTemperature();
 // Read temperature as Fahrenheit (isFahrenheit = true)
 float f = dht.readTemperature(true);

// Check if any reads failed and exit early (to try again).
 if (isnan(h) || isnan(t) || isnan(f)) {
 Serial.println("Failed to read from DHT sensor!");
 timeSinceLastRead = 0;
 return;
 }

// Compute heat index in Fahrenheit (the default)
 float hif = dht.computeHeatIndex(f, h);
 // Compute heat index in Celsius (isFahreheit = false)
 float hic = dht.computeHeatIndex(t, h, false);

Serial.print("Humidity: ");
 Serial.print(h);
 Serial.print(" %\t");
 Serial.print("Temperature: ");
 Serial.print(t);
 Serial.print(" *C ");
 Serial.print(f);
 Serial.print(" *F\t");
 Serial.print("Heat index: ");
 Serial.print(hic);
 Serial.print(" *C ");
 Serial.print(hif);
 Serial.println(" *F");

// Clear the buffer.
 display.begin(SSD1306_SWITCHCAPVCC, 0x3c); // initialize with the I2C addr 0x3D (for the 128x64)
 // Clear the buffer.
 display.clearDisplay();
 display.display();

 //display.clearDisplay();
 //display.display();

display.setTextSize(1);
 display.setTextColor(WHITE);
 display.setCursor(0,0);
 //char temperature[5] = "";
 //dtostrf(hif, 3,1,temperature);
 String buf;
 buf += F("Temperature: ");
 buf += String(hif,2);
 buf += " F";
 display.println(buf);
 buf="";
 buf += F("Humidity: ");
 buf += String(h,2);
 buf += "%";
 //char humidity[5] = "";
 //dtostrf(h, 3,1,humidity);
 display.println(buf);
 display.display();

/* //Send Temp & Humidity to OLED
display.clearDisplay();
display.display();
 display.setTextSize(1);
 display.setTextColor(WHITE);
 display.setCursor(0,0);
 display.println("Temperature: *F");
 display.println("Humidity: %");
 display.display();*/
/*
 display.setTextSize(1);
 display.setTextColor(WHITE);
 display.setCursor(0,0);
 display.println("");
 display.setTextSize(2);
 display.println("Temperature: F");
 display.println("Humidity: %");
 display.display();
 */

timeSinceLastRead = 0;
 }
 delay(100);
 timeSinceLastRead += 100;
}
Losant Example
The Whole Kaboodle

