Global Protect LDAP over SSL

I recently had need to reconfigure LDAP settings on a Palo Alto firewall. I had retired two production domain controllers and stood up two new boxes in their place. Remote access VPN users are authenticated by the firewall via LDAP on port 389, or LDAP over SSL (LDAPS) on port 636.

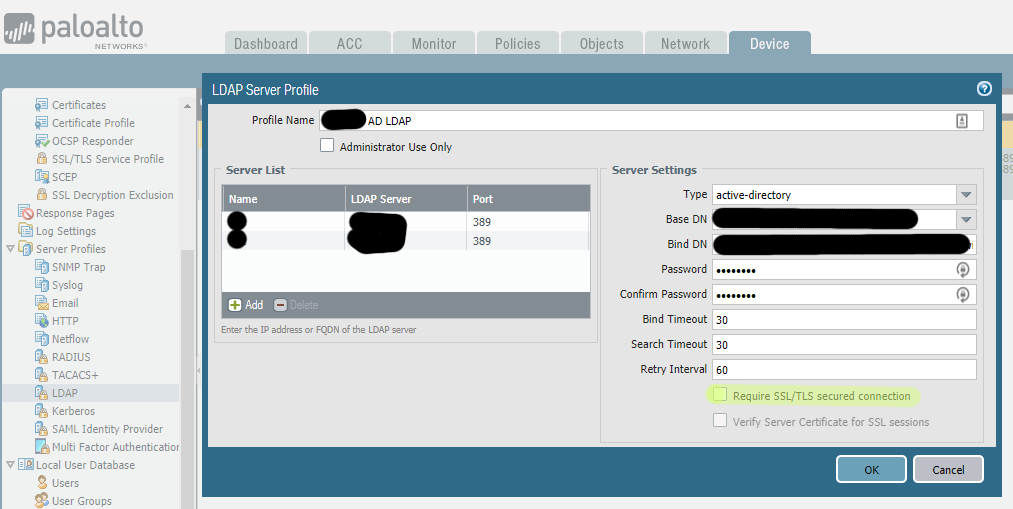
The quickest solution was to provide the firewall with the FQDN, IP Address, and port numbers needed to communicate with the new domain controllers using the LDAP protocol. Ensure ‘Require SSL/TLS secured connection’ is not selected

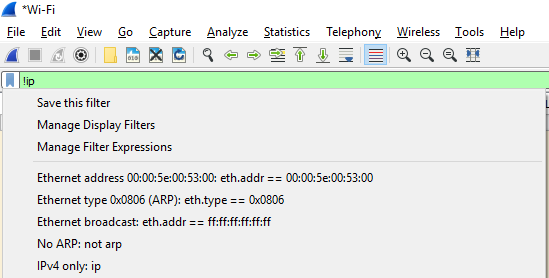
I make this note as I had assumed the new domain controllers were talking LDAPS by default but I was wrong. A quick look over the authentication log, authd.log, using the command  > tail follow yes mp-log authd.log, revealed this:

2018-07-11 09:05:04.826 -0500 Error: pan_authd_ldap_bind(pan_authd_shared_ldap.c:615): Failed to bind ldap (Can't contact LDAP server)
2018-07-11 09:05:04.826 -0500 Error: pan_auth_create_a_ldap_session(pan_auth_svr_cctxt.c:1971): Failed to bind, get out
2018-07-11 09:05:04.827 -0500 debug: pan_auth_response_process(pan_auth_state_engine.c:4073): auth status: auth server not available

A more secure implementation would take advantage of LDAPS. In a nutshell, you will need to generate your own self-signed certificate, or better, install a certificate provided to you by a CA. Also, LDP.exe is a helpful utility that can verify a successful connection or binding to your directory. It can be obtained by downloading the Microsoft Remote Server Administration Tools (RSAT)

In this post I’ll review configuring my new domain controllers with self-signed certificates in lieu of obtaining signed certificates from a CA. To start, open Server Manager on a new domain controller and install the Active Directory Certificate Services role. As you proceed through the wizard, be sure to configure AD-CS as an Enterprise, Root CA. 

Open the Certificate Templates Console: Launch mmc.exe and add the Certificate Templates snap in and click OK. In the left pane of the snap in right click the domain controller and click View Object Identifiers. In the dialog window, scroll down to the Server Authentication Policy and ensure the Object Identifier is displayed as 1.3.6.1.5.5.7.3.1.

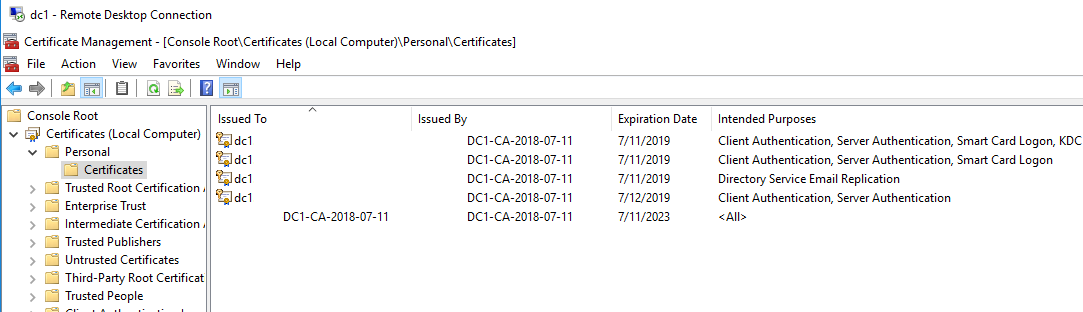
Add the Certificates snap in to MMC and instruct the Certificates snap in to manage certificates for the Computer account. Expand the Personal folder in Certificates snap in and right click on the Certificates sub folder, select All Tasks -> Request New Certificate. Select Active Directory Enrollment Policy and click Next. Select Domain Controller and click Enroll. Once finished you’ll see a certificate issued to each domain controller in the domain. You can view these new certificates now in the Local Computer Certificate Store, specifically within the Personal->Certificates sub-node.

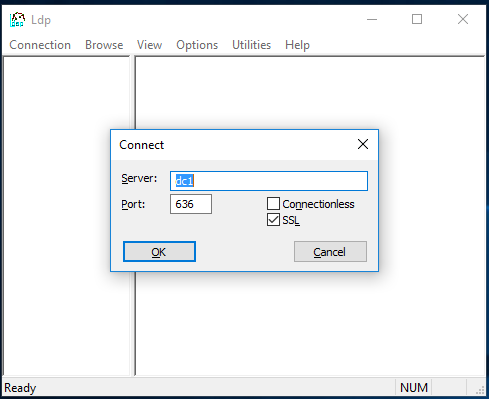
At this point, your domain controller should be configured to respond to connection attempts using LDAPS. You can verify this using the LDP.exe utility from Microsoft.


Resources:

How to Troubleshoot LDAP Authentication

Troubleshooting GlobalProtect

Configuring Secure LDAP Connection on Server 2016


Import Palo Alto Firewall Appliance into GNS3

After obtaining a virtual machine in the form of an OVA file, we need to expand the archive and convert the vmdk to a qcow2 format as specified during the GNS3 Import Appliance dialogue.  The full instructions to convert an OVA to a qcow2 format can be found at cloud.garr.it.

tar xvf pa-vm-esxi-8.0.0.ova

A prerequisite package must be installed to provide us with the means to make the conversion.

apt -y install qemu

With the qemu package installed, we can begin the conversion.

qemu-img convert -f vmdk $FILE-disk1.vmdk -O qcow2 $FILE.qcow2

Virtualbox Shared Folder Missing

Here is a short write up of my experience configuring Shared Folders under Oracle Virtualbox 5.2.2 for a Kali 2017.3  appliance. After importing the appliance, I am warned USB 2.0 can only be supported after installing the Oracle Virtualbox Extension Pack, obtained here. You can double click on the installer and Virtualbox will pick up and carry the installation through completion. After that, I reboot.

Next step is to install the  virtualbox-guest-x11 package instead of using the supplied package available through the cdrom0 device in vm settings. I try the advice listed here. After a reboot, I check /media and there is still no monted folder.

Turns out I need to manually mount the drive in my guest operating system.

mount -t vboxsf -o uid=1000,gid=1000 C_DRIVE ~/Documents/cdrive/

Additional resources regarding shared folders can be referenced on the Ubuntu wiki.

I was curious what the options, “-o uid=1000, gid=1000″ meant. Turns out we’re setting the owners of this folder to the user with an id of 1000 and the group with an id of 1000. If you’d like to discover the uid and gid of a user, run the following two commands.

id -u <username>

id -g <groupname>

You can learn more about userid and groupid by having a look at this help page at Indiana University.


Apple Printer Resource Path

When creating a payload in Apple Profile Manager, you need to not only specify the IP address, but also a resource path.

The best way to do so to issue ippfind from a box running MacOS.

Practical Packet Analysis Notes 2

This 2nd post continues my notes from reading Practical Packet Analysis.

Unreachable port / Unreachable host

A loss of network connectivity can often be seen in Wireshark. For example, a Windows host will attempt 5 re-transmissions. While Wireshark does label these TCP Retransmission, you can also identify this process as each packet has the same Sequence value.

Often the the reply to an echo will source from a switch or router, and often you’ll observe an ARP request for the destination host to reply with a MAC address. This reply can be ICMP type 0 or 3. Code 1 in the ICMP packet = host unreachable. Code2 = port unreachable.

Fragmentation

When layer 4 hands segments to layer 3 that are greater than 1500 bytes, the limit that can be carried in a frame across layer 2, the IP packets will be fragmented to fit.

Looking at the IP layer details of such a packet you can see Flags set to 0x01, meaning more fragments follow. The offset of the first packet in this data stream will be 0. The following fragment will show an offset ~1480. Fragmented packets will follow until the last arrives with a flag of 0x00 and that means no more fragments will follow.


Practical Packet Analysis Notes 1

Hubbing out involves placing a hub or something like a Throwing Star lan tap between a host and switch. Per the books, in most situations duplex of target is cut to half.

View->Coloring Rules is a handy way to add your own rules to make traffic stand out.

Mark a packet so it stands out with white text & black backdrop. CTRL+M and you can advance or reverse with ctrl-shift-n and ctrl-shift-b.

You can merge pcaps. Tie together captures from multiple devices to get a better view. File-> Merge

Create capture and display filters. Wireshark uses comparison and logical operators.

 Comparison Operators
==     equal to
!=     not equal to
>     greater than
<     less than
>=     greater than or equal to
<=     less than or equal to

Logical Operators
and     both conditions must be true
or        either one of the conditions must be true
xor     one and only one condition must be true
not     neither one of the conditions is true
Sample Filter Expressions
host www.biokode.net     display all traffic from host www.example.com

!ip     display all non IP traffic

ip.dst==192.168.1.1     Display all traffic with a destination of 192.168.1.1

You can manage and apply existing filters, or create a new filter from a current expression from within the filter construction dialog by clicking on the small filter icon to the left of the filter expression icon within the filter toolbar!

Name Resolution

You can enable name resolution by opening the Capture Options dialog. Capture–> Options and then select Options tab.

  1. MAC Name Resolution – Uses ARP to convert layer 2 MAC address into layer 3 IP addresses;  display 00:11:22:33:44:55:66 as 192.168.1.7.
  2. Network Name Resolution – Uses DNS to resolve IP addresses to human readable DNS names; display 192.168.1.7 as SalesWorkstation001.
  3. Transport Name Resolution – Convert port number to associated transport technology; display port 80 as http.

Name resolution may not be desirable. It can add processing overhead and resolution can fail. A capture does not store name resolution data, so expect this overhead when reviewing previously saved captures.

Protocol Dissection

Wireshark relies on protocol dissectors to to convert raw data into something understood by Wireshark, but it can select the wrong protocol dissector. Most commonly this occurs when a standard protocol is using a non-standard port. For instance, HTTP traffic flowing over port 22 could be classified as SSH!

Right click on a packet and from the menu select “Decode As.” This enables you to select a different protocol dissector than that which was chosen by Wireshark.

Following TCP Streams

Right click on a packet in the Packet list pane of the main window to Follow->TCP Stream  and view related packets and their payload that is delivered to the application level in the OSI stack. You can also select a TCP packet in the TCP  tab of the Statistics->Conversations dialog.

Endpoints

Statistics->Endpoints  summarizes traffic measured in bits, bytes, and packets grouped by hosts.

Unifi AP hostname no update

You need to initiate a provisioning of a Ubiquiti Unifi access point to make active a change to the Alias.  This can be done by changing something like the channel used in the 2.4 or 5 Ghz spectrum or modifying radio signal strength.

Restarting the access point is not sufficient.

Until you do this, running info form the BusyBox CLI on the access point reflects the old alias. Similarily, attempting to Add Device using SNMP in LibreNMS will fail too.


Dynamic DNS Updates

Non domain dhcp clients do not get a DNS record when they receive a lease.

Add new user with a password that does not expire. Add member to the DHCP Administrators security group.

Open DHCP console, connect to DHCP server and access IPv4 properties. Under the Advanced tab, specify the credentials you specified earlier.

I found restarting the DHCP and DNS services had no effect, so in my experience rebooting the Windows Server 2012 R2 box that hosted DNS and DHCP did the trick.

Now I see various wireless clients, including non-domain joined windows laptop and iPhones with names that now resolve to IP addresses.

It is worth a mention: I disabled secure updates.


Apparently you can acheive the same thing by adding the DHCP server to the DNSUpdateProxy group. But, this is a security risk if the box that DHCP is running on is also a domain controller. That is because the AD records can be written to by anyone. OpenACLOnProxyUpdate setting can mitigate the risk. The recommended solution is to specify credentials for the dynamic DNS update.

Ubiquiti EdgeOS Find MAC Address

On a core layer switch I wanted to learn what port was connected to an access layer switch. This would enable me to add the missing documentation of the network topology.

First find the MAC address of the access layer switch. We’ll search for this value in the IP stack’s ARP table. To do this, jump into Unifi and select your access layer switch. From the Properties window, select the Configuration tab, then expand Debug Terminal. Click Open Terminal and when the terminal opens run the info command from the BusyBox CLI. This will reveal a  few details about the switch, including the MAC address of the management interface.

With the MAC address in hand we will search for it from the Edgeswitch CLI.

(UBNT EdgeSwitch) #show mac-addr-table 04:18:d6:f0:d2:34

VLAN ID  MAC Address         Interface              IfIndex  Status
-------  ------------------  ---------------------  -------  ------------
1        04:18:D6:F0:D2:34   0/8                    8        Learned

(UBNT EdgeSwitch) #

On the other hand, you can find the MAC address of a device on the other end of a link by specifying an interface instead.

(UBNT EdgeSwitch) #show mac-addr-table interface 0/16
   MAC Address      VLAN ID      Status

-----------------  ---------  ------------
D4:F4:BE:1F:99:11     1        Learned

(UBNT EdgeSwitch) #

more to come….